- Download the two CentOS 7.0 DVDs from a mirror next to you (the list of mirrors can be found here:http://isoredirect.centos.org/centos/7/isos/x86_64/CentOS-7.0-1406-x86_64-DVD.iso.
- A fast internet connection
2. Preliminary Note
In this tutorial I use the hostname server1.example.com with the IP address 192.168.0.100 and the gateway 192.168.0.1. These settings might differ for you, so you have to replace them where appropriate. Please install the minimal CentOS 7 installation from this tutorial link before proceeding ahead.
3 Install nano editor and adjust /etc/hosts
yum -y install nano wget
Next we edit /etc/hosts. Make it look like this:
nano /etc/hosts
127.0.0.1   localhost localhost.localdomain localhost4 localhost4.localdomain4
192.168.0.100   server1.example.com     server1

::1         localhost localhost.localdomain localhost6 localhost6.localdomain6
and set the hostname to server1.example.com:
echo 'server1.example.com' > /etc/hostname
(You can skip this chapter if you have already disabled the firewall at the end of the basic system installation.)
I want to install ISPConfig at the end of this tutorial which comes with its own firewall. That's why I disable the default CentOS firewall now. Of course, you are free to leave it on and configure it to your needs (but then you shouldn't use any other firewall later on as it will most probably interfere with the CentOS firewall).
Run
systemctl stop firewalld.service
systemctl disable firewalld.service
[root@server1 ~]# systemctl disable firewalld.service
rm '/etc/systemd/system/dbus-org.fedoraproject.FirewallD1.service'
rm '/etc/systemd/system/basic.target.wants/firewalld.service'
[root@server1 ~]#and disable the firewall.
To check that the firewall has really been disabled, you can run
firewall-cmd --state
afterwards. The output should look like this:
[root@server1 ~]# firewall-cmd --state
not running
[root@server1 ~]#
yum -y install net-tools NetworkManager-tui
5 Disable SELinux
SELinux is a security extension of CentOS that should provide extended security. In my opinion you don't need it to configure a secure system, and it usually causes more problems than advantages (think of it after you have done a week of trouble-shooting because some service wasn't working as expected, and then you find out that everything was ok, only SELinux was causing the problem). Therefore I disable it (this is a must if you want to install ISPConfig later on).
Edit /etc/selinux/config and set SELINUX=disabled:
nano /etc/selinux/config
# This file controls the state of SELinux on the system.
# SELINUX= can take one of these three values:
#     enforcing - SELinux security policy is enforced.
#     permissive - SELinux prints warnings instead of enforcing.
#     disabled - No SELinux policy is loaded.
SELINUX=disabled
# SELINUXTYPE= can take one of these two values:
#     targeted - Targeted processes are protected,
#     mls - Multi Level Security protection.
SELINUXTYPE=targeted
Afterwards we must reboot the system:
reboot
6 Enable Additional Repositories And Install Some Software
We will enable EPEL repositories on our CentOS system as lots of the packages that we are going to install in the course of this tutorial are not available in the official CentOS 7.0 repositories:
yum -y install epel-release
yum -y install yum-priorities
Edit /etc/yum.repos.d/epel.repo...
nano /etc/yum.repos.d/epel.repo
... and add the line priority=10 to the [epel] section:
[epel]
name=Extra Packages for Enterprise Linux 7 - $basearch
#baseurl=http://download.fedoraproject.org/pub/epel/7/$basearch
mirrorlist=https://mirrors.fedoraproject.org/metalink?repo=epel-7&arch=$basearch
failovermethod=priority
enabled=1
priority=10
gpgcheck=1
gpgkey=file:///etc/pki/rpm-gpg/RPM-GPG-KEY-EPEL-7

[...]
Then we update our existing packages on the system:
yum update
Now we install some software packages that are needed later on:
yum -y groupinstall 'Development Tools'
7 Quota
(If you have chosen a different partitioning scheme than I did, you must adjust this chapter so that quota applies to the partitions where you need it.)
To install quota, we run this command:
yum -y install quota
Now we check if quota is already enabled for the filesystem where the website (/var/www) and maildir data (var/vmail) is stored. In this example setup, I have one big root partition, so I search for ' / ':
mount | grep ' / '
[root@server1 ~]# mount | grep ' / '
/dev/mapper/centos-root on / type xfs (rw,relatime,attr2,inode64,noquota)
[root@server1 ~]#
If you have a separate /var partition, then use:
mount | grep ' /var '
instead. If the line contains the word "noquota", then proceed with the following steps to enable quota.
Enabling quota on the / (root) partition
Normally you would enable quota in the /etc/fstab file, but if the filesystem is the root filesystem "/", then quota has to be enabled by a boot parameter of the Linux Kernel.
Edit the grub configuration file:
nano /etc/default/grub
search fole the line that starts with GRUB_CMDLINE_LINUX and add rootflags=uquota,gquota to the commandline parameters so that the resulting line looks like this:
[...]

GRUB_CMDLINE_LINUX="rd.lvm.lv=centos/swap vconsole.font=latarcyrheb-sun16 rd.lvm.lv=centos/root crashkernel=auto  vconsole.keymap=us rhgb quiet rootflags=uquota,gquota"
[...]
and apply the changes by running the following command.
cp /boot/grub2/grub.cfg /boot/grub2/grub.cfg_bak
grub2-mkconfig -o /boot/grub2/grub.cfg
and reboot the server.
reboot
Now check if quota is enabled:
mount | grep ' / '
[root@server1 ~]# mount | grep ' / '
/dev/mapper/centos-root on / type xfs (rw,relatime,attr2,inode64,usrquota,grpquota)
[root@server1 ~]#
When quota is active, we can see "usrquota,grpquota" in the mount option list.
Enabling quota on a separate /var partition
If you have a separate /var partition, then edit /etc/fstab and add ,uquota,gquota to the / partition (/dev/mapper/centos-var):
nano /etc/fstab
#
# /etc/fstab
# Created by anaconda on Sun Sep 21 16:33:45 2014
#
# Accessible filesystems, by reference, are maintained under '/dev/disk'
# See man pages fstab(5), findfs(8), mount(8) and/or blkid(8) for more info
#
/dev/mapper/centos-root /                       xfs     defaults        1 1
/dev/mapper/centos-var /var                     xfs     defaults,uquota,gquota        1 2
UUID=9ac06939-7e43-4efd-957a-486775edd7b4 /boot                   xfs     defaults        1 3
/dev/mapper/centos-swap swap                    swap    defaults        0 0
Then run
mount -o remount /var
quotacheck -avugm
quotaon -avug
to enable quota.
8 Synchronize The System Clock
It is a good idea to synchronize the system clock with an NTP (network time protocol) server over the Internet. Simply run
yum -y install ntp
and your system time will always be in sync.
We will install MariaDB-server and client as follows:
yum -y install mariadb mariadb-server
We want the Mariadb service to run on and after boot, and start the service as:
systemctl enable mariadb.service
systemctl start mariadb.service
Set passwords for the MySQL root account:
mysql_secure_installation
[root@server1 ~]# mysql_secure_installation
/usr/bin/mysql_secure_installation: line 379: find_mysql_client: command not found
NOTE: RUNNING ALL PARTS OF THIS SCRIPT IS RECOMMENDED FOR ALL MariaDB
SERVERS IN PRODUCTION USE! PLEASE READ EACH STEP CAREFULLY!
In order to log into MariaDB to secure it, we'll need the current
password for the root user. If you've just installed MariaDB, and
you haven't set the root password yet, the password will be blank,
so you should just press enter here.<--ENTER
Enter current password for root (enter for none): <--ENTER
OK, successfully used password, moving on...
Setting the root password ensures that nobody can log into the MariaDB
root user without the proper authorisation.
Set root password? [Y/n]<--ENTER
New password: <--yourmariadbpassword
Re-enter new password: <--yourmariadbpassword
Password updated successfully!
Reloading privilege tables..
... Success!
By default, a MariaDB installation has an anonymous user, allowing anyone
to log into MariaDB without having to have a user account created for
them. This is intended only for testing, and to make the installation
go a bit smoother. You should remove them before moving into a
production environment.
Remove anonymous users? [Y/n] <--ENTER
... Success!
Normally, root should only be allowed to connect from 'localhost'. This
ensures that someone cannot guess at the root password from the network.
Disallow root login remotely? [Y/n]<--ENTER
... Success!
By default, MariaDB comes with a database named 'test' that anyone can
access. This is also intended only for testing, and should be removed
before moving into a production environment.
Remove test database and access to it? [Y/n]<--ENTER
- Dropping test database...
... Success!
- Removing privileges on test database...
... Success!
Reloading the privilege tables will ensure that all changes made so far
will take effect immediately.
Reload privilege tables now? [Y/n] <--ENTER
... Success!
Cleaning up...
All done! If you've completed all of the above steps, your MariaDB
installation should now be secure.
Thanks for using MariaDB!
[root@server1 ~]#
10 Install Dovecot
Dovecot can be installed as follows:
yum -y install dovecot dovecot-pigeonhole dovecot-mysql
Create a empty dovecot-sql.conf file and symlink:
touch /etc/dovecot/dovecot-sql.conf
ln -s /etc/dovecot/dovecot-sql.conf /etc/dovecot-sql.conf
Now create the system startup links and start Dovecot:
systemctl enable dovecot.service
systemctl start dovecot.service
11 Install Postfix
Postfix can be installed as follows:
yum -y install postfix
Then turn off Sendmail and start Postfix:
systemctl enable mariadb.service
systemctl start mariadb.service
systemctl stop sendmail.service
systemctl disable sendmail.service
systemctl enable postfix.service
systemctl restart postfix.service
12 Install Getmail
Getmail can be installed as follows:
yum -y install getmail
13 Install Amavisd-new, SpamAssassin, And ClamAV
To install amavisd-new, spamassassin and clamav, run the following command:
yum -y install amavisd-new spamassassin clamav clamd clamav-update unzip bzip2 unrar perl-DBD-mysql
Edit the freshclam configuration file /etc/freshclam.conf
nano /etc/freshclam.conf
and comment out the line "Example"
[....]
# Example
[....]
Then we start freshclam, amavisd, and clamd.amavisd:
sa-update
freshclam
systemctl enable amavisd.service
14 Install Nginx, PHP5 (PHP-FPM), And Fcgiwrap
Nginx is available as a package for CentOS 7.0 (from EPEL) which we can install as follows:
yum -y install nginx
If Apache2 is already installed on the system, stop it now...
systemctl stop httpd.service
... and remove Apache's system startup links:
systemctl disable httpd.service
Then we create the system startup links for nginx and start it:
systemctl enable nginx.service
systemctl start nginx.service
(If both Apache2 and nginx are installed, the ISPConfig 3 installer will ask you which one you want to use - answer nginx in this case. If only one of these both is installed, ISPConfig will do the necessary configuration automatically.)
We can make PHP5 work in nginx through PHP-FPM (PHP-FPM (FastCGI Process Manager) is an alternative PHP FastCGI implementation with some additional features useful for sites of any size, especially busier sites). We can install php-fpmtogether with php-cli and some PHP5 modules like php-mysql which you need if you want to use MySQL from your PHP scripts as follows:
yum -y install php-fpm php-cli php-mysql php-gd php-imap php-ldap php-odbc php-pear php-xml php-xmlrpc php-pecl-apc php-magickwand php-mbstring php-mcrypt php-mssql php-snmp php-soap php-tidy
Next we open /etc/php.ini...
nano /etc/php.ini
... and change the error reporting (so that notices aren't shown any longer):
[...]
;error_reporting = E_ALL & ~E_DEPRECATED & ~E_STRICT
error_reporting = E_ALL & ~E_NOTICE
[...]
Also set cgi.fix_pathinfo=0:
nano /etc/php.ini
[...]
; cgi.fix_pathinfo provides *real* PATH_INFO/PATH_TRANSLATED support for CGI.  PHP's
; previous behaviour was to set PATH_TRANSLATED to SCRIPT_FILENAME, and to not grok
; what PATH_INFO is.  For more information on PATH_INFO, see the cgi specs.  Setting
; this to 1 will cause PHP CGI to fix its paths to conform to the spec.  A setting
; of zero causes PHP to behave as before.  Default is 1.  You should fix your scripts
; to use SCRIPT_FILENAME rather than PATH_TRANSLATED.
; http://www.php.net/manual/en/ini.core.php#ini.cgi.fix-pathinfo
cgi.fix_pathinfo=0
[...]
(Please read http://wiki.nginx.org/Pitfalls to find out why you should do this.)
In addition to that, in order to avoid errors like
[08-Aug-2011 18:07:08] PHP Warning: phpinfo(): It is not safe to rely on the system's timezone settings. You are *required* to use the date.timezone setting or the date_default_timezone_set() function. In case you used any of those methods and you are still getting this warning, you most likely misspelled the timezone identifier. We selected 'Europe/Berlin' for 'CEST/2.0/DST' instead in /usr/share/nginx/html/info.php on line 2
... in /var/log/php-fpm/www-error.log when you call a PHP script in your browser, you should set date.timezone in/etc/php.ini:
[...]
[Date]
; Defines the default timezone used by the date functions
; http://www.php.net/manual/en/datetime.configuration.php#ini.date.timezone
date.timezone = "Europe/Berlin"
[...]
Next create the system startup links for php-fpm and start it:
systemctl enable php-fpm
systemctl restart php-fpm
PHP-FPM is a daemon process (with the init script /etc/init.d/php-fpm) that runs a FastCGI server on port 9000.
To get CGI support in nginx, we install Fcgiwrap.
Fcgiwrap is a CGI wrapper that should work also for complex CGI scripts and can be used for shared hosting environments because it allows each vhost to use its own cgi-bin directory.
As there's no fcgiwrap package for CentOS 7.0, we must build it ourselves. First we install some prerequisites:
yum -y install fcgi-devel
Now we can build fcgiwrap as follows:
cd /usr/local/src/
git clone git://github.com/gnosek/fcgiwrap.git
cd fcgiwrap
autoreconf -i
./configure
make
make install
This installs fcgiwrap to /usr/local/sbin/fcgiwrap.
Next we install the spawn-fcgi package which allows us to run fcgiwrap as a daemon:
yum -y install spawn-fcgi
Open /etc/sysconfig/spawn-fcgi...
nano /etc/sysconfig/spawn-fcgi
... and modify the file as follows:
# You must set some working options before the "spawn-fcgi" service will work.
# If SOCKET points to a file, then this file is cleaned up by the init script.
#
# See spawn-fcgi(1) for all possible options.
#
# Example :
#SOCKET=/var/run/php-fcgi.sock
#OPTIONS="-u apache -g apache -s $SOCKET -S -M 0600 -C 32 -F 1 -P /var/run/spawn-fcgi.pid -- /usr/bin/php-cgi"

FCGI_SOCKET=/var/run/fcgiwrap.socket
FCGI_PROGRAM=/usr/local/sbin/fcgiwrap
FCGI_USER=apache
FCGI_GROUP=apache
FCGI_EXTRA_OPTIONS="-M 0770"
OPTIONS="-u $FCGI_USER -g $FCGI_GROUP -s $FCGI_SOCKET -S $FCGI_EXTRA_OPTIONS -F 1 -P /var/run/spawn-fcgi.pid -- $FCGI_PROGRAM"
Now add the user nginx to the group apache:
usermod -a -G apache nginx
Create the system startup links for spawn-fcgi...
chkconfig spawn-fcgi on
... and start it as follows:
systemctl start spawn-fcgi
You should now find the fcgiwrap socket in /var/run/fcgiwrap.socket, owned by the user and group apache (some scripts, e.g. Mailman, expect to be run by the user/group apache, that's why we don't run spawn-fcgi as user/group nginx, but instead add nginx to the apache group).
14.1 Additional PHP Versions
Starting with the ISPConfig 3.0.5, it is possible to have multiple PHP versions on one server (selectable through ISPConfig) which can be run through FastCGI and PHP-FPM. The procedure of building additional PHP versions on CentOS is described in this tutorial: How To Use Multiple PHP Versions (PHP-FPM & FastCGI) With ISPConfig 3 (CentOS 6.3)
15 Install phpMyAdmin
Next we install phpMyAdmin:
yum -y install phpmyadmin
Next we change the authentication in phpMyAdmin fromcookie to http:
nano /etc/phpMyAdmin/config.inc.php
[...]
/* Authentication type */
$cfg['Servers'][$i]['auth_type'] = 'http';
[...]
You can now find phpMyAdmin in the /usr/share/phpMyAdmin/ directory.
After you have installed ISPConfig 3, you can access phpMyAdmin as follows:
The ISPConfig apps vhost on port 8081 for nginx comes with a phpMyAdmin configuration, so you can usehttp://server1.example.com:8081/phpmyadmin or http://server1.example.com:8081/phpMyAdmin to access phpMyAdmin.
If you want to use a /phpmyadmin or /phpMyAdmin alias that you can use from your web sites, this is a bit more complicated than for Apache because nginx does not have global aliases (i.e., aliases that can be defined for all vhosts). Therefore you have to define these aliases for each vhost from which you want to access phpMyAdmin.
To do this, paste the following into the nginx Directives field on theOptions tab of the web site in ISPConfig:
        location /phpmyadmin {
               root /usr/share/;
               index index.php index.html index.htm;
               location ~ ^/phpmyadmin/(.+\.php)$ {
                       try_files $uri =404;
                       root /usr/share/;
                       fastcgi_pass 127.0.0.1:9000;
                       fastcgi_index index.php;
                       fastcgi_param SCRIPT_FILENAME $request_filename;
                       include /etc/nginx/fastcgi_params;
                       fastcgi_param PATH_INFO $fastcgi_script_name;
                       fastcgi_buffer_size 128k;
                       fastcgi_buffers 256 4k;
                       fastcgi_busy_buffers_size 256k;
                       fastcgi_temp_file_write_size 256k;
                       fastcgi_intercept_errors on;
               }
               location ~* ^/phpmyadmin/(.+\.(jpg|jpeg|gif|css|png|js|ico|html|xml|txt))$ {
                       root /usr/share/;
               }
        }
        location /phpMyAdmin {
               rewrite ^/* /phpmyadmin last;
        }
If you use https instead of http for your vhost, you should add the line fastcgi_param HTTPS on; to your phpMyAdmin configuration like this:
        location /phpmyadmin {
               root /usr/share/;
               index index.php index.html index.htm;
               location ~ ^/phpmyadmin/(.+\.php)$ {
                       try_files $uri =404;
                       root /usr/share/;
                       fastcgi_pass 127.0.0.1:9000;
                       fastcgi_param HTTPS on; # <-- add this line
                       fastcgi_index index.php;
                       fastcgi_param SCRIPT_FILENAME $request_filename;
                       include /etc/nginx/fastcgi_params;
                       fastcgi_param PATH_INFO $fastcgi_script_name;
                       fastcgi_buffer_size 128k;
                       fastcgi_buffers 256 4k;
                       fastcgi_busy_buffers_size 256k;
                       fastcgi_temp_file_write_size 256k;
                       fastcgi_intercept_errors on;
               }
               location ~* ^/phpmyadmin/(.+\.(jpg|jpeg|gif|css|png|js|ico|html|xml|txt))$ {
                       root /usr/share/;
               }
        }
        location /phpMyAdmin {
               rewrite ^/* /phpmyadmin last;
        }
If you use both http and https for your vhost, you can use the $https variable - go to the nginx Directives field again, and instead of fastcgi_param HTTPS on; you add the line fastcgi_param HTTPS $https; so that you can use phpMyAdmin for both http and https requests:
        location /phpmyadmin {
               root /usr/share/;
               index index.php index.html index.htm;
               location ~ ^/phpmyadmin/(.+\.php)$ {
                       try_files $uri =404;
                       root /usr/share/;
                       fastcgi_pass 127.0.0.1:9000;
                       fastcgi_param HTTPS $https; # <-- add this line
                       fastcgi_index index.php;
                       fastcgi_param SCRIPT_FILENAME $request_filename;
                       include /etc/nginx/fastcgi_params;
                       fastcgi_param PATH_INFO $fastcgi_script_name;
                       fastcgi_buffer_size 128k;
                       fastcgi_buffers 256 4k;
                       fastcgi_busy_buffers_size 256k;
                       fastcgi_temp_file_write_size 256k;
                       fastcgi_intercept_errors on;
               }
               location ~* ^/phpmyadmin/(.+\.(jpg|jpeg|gif|css|png|js|ico|html|xml|txt))$ {
                       root /usr/share/;
               }
        }
        location /phpMyAdmin {
               rewrite ^/* /phpmyadmin last;
        }
16 Install Mailman
Since version 3.0.4, ISPConfig also allows you to manage (create/modify/delete) Mailman mailing lists. If you want to make use of this feature, install Mailman as follows:
yum -y install mailman
Before we can start Mailman, a first mailing list called mailman must be created:
touch /var/lib/mailman/data/aliases
touch /etc/mailman/aliases
/usr/lib/mailman/bin/newlist mailman
[root@server1 tmp]# /usr/lib/mailman/bin/newlist mailman
Enter the email of the person running the list: <-- admin email address, e.g. listadmin@example.com
Initial mailman password: <-- admin password for the mailman list
To finish creating your mailing list, you must edit your /etc/aliases (or
equivalent) file by adding the following lines, and possibly running the
`newaliases' program:
## mailman mailing list
mailman: "|/usr/lib/mailman/mail/mailman post mailman"
mailman-admin: "|/usr/lib/mailman/mail/mailman admin mailman"
mailman-bounces: "|/usr/lib/mailman/mail/mailman bounces mailman"
mailman-confirm: "|/usr/lib/mailman/mail/mailman confirm mailman"
mailman-join: "|/usr/lib/mailman/mail/mailman join mailman"
mailman-leave: "|/usr/lib/mailman/mail/mailman leave mailman"
mailman-owner: "|/usr/lib/mailman/mail/mailman owner mailman"
mailman-request: "|/usr/lib/mailman/mail/mailman request mailman"
mailman-subscribe: "|/usr/lib/mailman/mail/mailman subscribe mailman"
mailman-unsubscribe: "|/usr/lib/mailman/mail/mailman unsubscribe mailman"
Hit enter to notify mailman owner... <-- ENTER
[root@server1 tmp]#
Open /etc/aliases afterwards...
nano /etc/aliases
... and add the following lines:
[...]
mailman:              "|/usr/lib/mailman/mail/mailman post mailman"
mailman-admin:        "|/usr/lib/mailman/mail/mailman admin mailman"
mailman-bounces:      "|/usr/lib/mailman/mail/mailman bounces mailman"
mailman-confirm:      "|/usr/lib/mailman/mail/mailman confirm mailman"
mailman-join:         "|/usr/lib/mailman/mail/mailman join mailman"
mailman-leave:        "|/usr/lib/mailman/mail/mailman leave mailman"
mailman-owner:        "|/usr/lib/mailman/mail/mailman owner mailman"
mailman-request:      "|/usr/lib/mailman/mail/mailman request mailman"
mailman-subscribe:    "|/usr/lib/mailman/mail/mailman subscribe mailman"
mailman-unsubscribe:  "|/usr/lib/mailman/mail/mailman unsubscribe mailman"
Run
newaliases
afterwards and restart Postfix:
systemctl restart postfix.service
Create the system startup links for Mailman and start it:
systemctl enable mailman.service
systemctl start mailman.service
Now we need to create this symlink to make Mailman work with ISPConfig:
cd /usr/lib/mailman/cgi-bin/
ln -s ./ mailman
If you want to use Mailman from your web sites created through ISPConfig, this is a bit more complicated than for Apache because nginx does not have global aliases (i.e., aliases that can be defined for all vhosts). Therefore you have to define these aliases for each vhost from which you want to access Mailman.
To do this, paste the following into the nginx Directives field on the Options tab of the web site in ISPConfig:
        location /cgi-bin/mailman {
               alias /usr/lib/mailman/cgi-bin;
               fastcgi_split_path_info (^/cgi-bin/mailman/[^/]*)(.*)$;
               include /etc/nginx/fastcgi_params;
               fastcgi_param SCRIPT_FILENAME /usr/lib/mailman$fastcgi_script_name;
               fastcgi_param PATH_INFO $fastcgi_path_info;
               fastcgi_param PATH_TRANSLATED /usr/lib/mailman$fastcgi_path_info;
               fastcgi_intercept_errors on;
               fastcgi_pass unix:/var/run/fcgiwrap.socket;
        }

        location /images/mailman {
               alias /usr/lib/mailman/icons;
        }

        location /pipermail {
               alias /var/lib/mailman/archives/public;
               autoindex on;
        }
This defines the alias /cgi-bin/mailman/ for your vhost, which means you can access the Mailman admin interface for a list at http://<vhost>/cgi-bin/mailman/admin/<listname>, and the web page for users of a mailing list can be found at http://<vhost>/cgi-bin/mailman/listinfo/<listname>.
Under http://<vhost>/pipermail you can find the mailing list archives.
PureFTPd can be installed with the following command:
yum -y install pure-ftpd
Then create the system startup links and start PureFTPd:
systemctl enable pure-ftpd.service
systemctl start pure-ftpd.service
Now we configure PureFTPd to allow FTP and TLS sessions. FTP is a very insecure protocol because all passwords and all data are transferred in clear text. By using TLS, the whole communication can be encrypted, thus making FTP much more secure.
OpenSSL is needed by TLS; to install OpenSSL, we simply run:
yum -y install openssl
Open /etc/pure-ftpd/pure-ftpd.conf...
nano /etc/pure-ftpd/pure-ftpd.conf
If you want to allow FTP and TLS sessions, set TLS to 1:
[...]
# This option can accept three values :
# 0 : disable SSL/TLS encryption layer (default).
# 1 : accept both traditional and encrypted sessions.
# 2 : refuse connections that don't use SSL/TLS security mechanisms,
#     including anonymous sessions.
# Do _not_ uncomment this blindly. Be sure that :
# 1) Your server has been compiled with SSL/TLS support (--with-tls),
# 2) A valid certificate is in place,
# 3) Only compatible clients will log in.

TLS                      1
[...]
In order to use TLS, we must create an SSL certificate. I create it in /etc/ssl/private/, therefore I create that directory first:
mkdir -p /etc/ssl/private/
Afterwards, we can generate the SSL certificate as follows:
openssl req -x509 -nodes -days 7300 -newkey rsa:2048 -keyout /etc/ssl/private/pure-ftpd.pem -out /etc/ssl/private/pure-ftpd.pem
Country Name (2 letter code) [XX]: <-- Enter your Country Name (e.g., "DE").
State or Province Name (full name) []: <-- Enter your State or Province Name.
Locality Name (eg, city) [Default City]: <-- Enter your City.
Organization Name (eg, company) [Default Company Ltd]: <-- Enter your Organization Name (e.g., the name of your company).
Organizational Unit Name (eg, section) []: <-- Enter your Organizational Unit Name (e.g. "IT Department").
Common Name (eg, your name or your server's hostname) []: <-- Enter the Fully Qualified Domain Name of the system (e.g. "server1.example.com").
Email Address []: <-- Enter your Email Address.
Change the permissions of the SSL certificate:
chmod 600 /etc/ssl/private/pure-ftpd.pem
Finally restart PureFTPd:
systemctl restart pure-ftpd.service
That's it. You can now try to connect using your FTP client; however, you should configure your FTP client to use TLS.
18 Install BIND
We can install BIND as follows:
yum -y install bind bind-utils
Next open /etc/sysconfig/named...
nano /etc/sysconfig/named
... and make sure that the ROOTDIR=/var/named/chroot line is comment out:
# BIND named process options
# ~~~~~~~~~~~~~~~~~~~~~~~~~~
#
# OPTIONS="whatever"     --  These additional options will be passed to named
#                            at startup. Don't add -t here, enable proper
#                            -chroot.service unit file.
Make a backup of the existing /etc/named.conf file and create a new one as follows:
cp /etc/named.conf /etc/named.conf_bak
cat /dev/null > /etc/named.conf
nano /etc/named.conf
//
// named.conf
//
// Provided by Red Hat bind package to configure the ISC BIND named(8) DNS
// server as a caching only nameserver (as a localhost DNS resolver only).
//
// See /usr/share/doc/bind*/sample/ for example named configuration files.
//
options {
        listen-on port 53 { any; };
        listen-on-v6 port 53 { any; };
        directory       "/var/named";
        dump-file       "/var/named/data/cache_dump.db";
        statistics-file "/var/named/data/named_stats.txt";
        memstatistics-file "/var/named/data/named_mem_stats.txt";
        allow-query     { any; };
        recursion no;
};
logging {
        channel default_debug {
                file "data/named.run";
                severity dynamic;
        };
};
zone "." IN {
        type hint;
        file "named.ca";
};
include "/etc/named.conf.local";
Create the file /etc/named.conf.local that is included at the end of /etc/named.conf (/etc/named.conf.localwill later on get populated by ISPConfig if you create DNS zones in ISPConfig):
touch /etc/named.conf.local
Then we create the startup links and start BIND:
systemctl enable named.service
systemctl start named.service
19 Install Webalizer And AWStats
Webalizer and AWStats can be installed as follows:
yum -y install webalizer awstats perl-DateTime-Format-HTTP perl-DateTime-Format-Builder
20 Install Jailkit
Jailkit is needed only if you want to chroot SSH users. It can be installed as follows (important: Jailkit must be installed before ISPConfig - it cannot be installed afterwards!):
cd /tmp
wget http://olivier.sessink.nl/jailkit/jailkit-2.17.tar.gz
tar xvfz jailkit-2.17.tar.gz
cd jailkit-2.17
./configure
make
make install
cd ..
rm -rf jailkit-2.17*
21 Install fail2ban
This is optional but recommended, because the ISPConfig monitor tries to show the log:
yum -y install fail2ban
We must configure fail2ban to log to the log file /var/log/fail2ban.log because this is the log file that is monitored by the ISPConfig Monitor module. Open /etc/fail2ban/fail2ban.conf...
nano /etc/fail2ban/fail2ban.conf
... and make sure logtarget = /var/log/fail2ban.log :
[...]
# Option: logtarget
# Notes.: Set the log target. This could be a file, SYSLOG, STDERR or STDOUT.
#         Only one log target can be specified.
#         If you change logtarget from the default value and you are
#         using logrotate -- also adjust or disable rotation in the
#         corresponding configuration file
#         (e.g. /etc/logrotate.d/fail2ban on Debian systems)
# Values: [ STDOUT | STDERR | SYSLOG | FILE ]  Default: STDERR
#
logtarget = /var/log/fail2ban.log

[...]
Then create the system startup links for fail2ban and start it:
systemctl enable fail2ban.service
systemctl start fail2ban.service
22 Install rkhunter
rkhunter can be installed as follows:
yum -y install rkhunter
To install the Roundcube webmail client, run...
yum -y install roundcubemail
ISPConfig contains a default webmail alias for squirremail inside its apps vhost. We will use that alias for the more modern roundcube, so we create a symlink with the name squirrelmail in /usr/share
ln -s /usr/share/roundcubemail /usr/share/squirrelmail
After you have installed ISPConfig 3, you can access RoundcubeMail as follows:
The ISPConfig apps vhost on port 8081 for nginx comes with a /webmail alias configuration, so you can use http://server1.example.com:8081/webmail to access RoundcubeMail.
If you want to use a /webmail or /roundcubemail alias that you can use from your web sites, this is a bit more complicated than for Apache because nginx does not have global aliases (i.e., aliases that can be defined for all vhosts). Therefore you have to define these aliases for each vhost from which you want to access SquirrelMail.
To do this, paste the following into the nginx Directives field on the Options tab of the web site in ISPConfig:
To do this, paste the following into the nginx Directives field on the Options tab of the web site in ISPConfig:
        location /roundcubemail {
               root /usr/share/;
               index index.php index.html index.htm;
               location ~ ^/roundcubemail/(.+\.php)$ {
                       try_files $uri =404;
                       root /usr/share/;
                       fastcgi_pass 127.0.0.1:9000;
                       fastcgi_index index.php;
                       fastcgi_param SCRIPT_FILENAME $request_filename;
                       include /etc/nginx/fastcgi_params;
                       fastcgi_param PATH_INFO $fastcgi_script_name;
                       fastcgi_buffer_size 128k;
                       fastcgi_buffers 256 4k;
                       fastcgi_busy_buffers_size 256k;
                       fastcgi_temp_file_write_size 256k;
                       fastcgi_intercept_errors on;
               }
               location ~* ^/roundcubemail/(.+\.(jpg|jpeg|gif|css|png|js|ico|html|xml|txt))$ {
                       root /usr/share/;
               }
        }
        location /webmail {
               rewrite ^/* /roundcubemail last;
        }
If you use https instead of http for your vhost, you should add the line fastcgi_param HTTPS on; to your RoundcubeMail configuration like this:
        location /roundcubemail {
               root /usr/share/;
               index index.php index.html index.htm;
               location ~ ^/roundcubemail/(.+\.php)$ {
                       try_files $uri =404;
                       root /usr/share/;
                       fastcgi_pass 127.0.0.1:9000;
                       fastcgi_param HTTPS on; # <-- add this line
                       fastcgi_index index.php;
                       fastcgi_param SCRIPT_FILENAME $request_filename;
                       include /etc/nginx/fastcgi_params;
                       fastcgi_param PATH_INFO $fastcgi_script_name;
                       fastcgi_buffer_size 128k;
                       fastcgi_buffers 256 4k;
                       fastcgi_busy_buffers_size 256k;
                       fastcgi_temp_file_write_size 256k;
                       fastcgi_intercept_errors on;
               }
               location ~* ^/roundcubemail/(.+\.(jpg|jpeg|gif|css|png|js|ico|html|xml|txt))$ {
                       root /usr/share/;
               }
        }
        location /webmail {
               rewrite ^/* /roundcubemail last;
        }
If you use both http and https for your vhost, you can use the $https variable - go to the nginx Directives field again, and instead of fastcgi_param HTTPS on; you add the line fastcgi_param HTTPS $https; so that you can use RoundcubeMail for both http and https requests:
        location /roundcubemail {
               root /usr/share/;
               index index.php index.html index.htm;
               location ~ ^/roundcubemail/(.+\.php)$ {
                       try_files $uri =404;
                       root /usr/share/;
                       fastcgi_pass 127.0.0.1:9000;
                       fastcgi_param HTTPS $https; # <-- add this line
                       fastcgi_index index.php;
                       fastcgi_param SCRIPT_FILENAME $request_filename;
                       include /etc/nginx/fastcgi_params;
                       fastcgi_param PATH_INFO $fastcgi_script_name;
                       fastcgi_buffer_size 128k;
                       fastcgi_buffers 256 4k;
                       fastcgi_busy_buffers_size 256k;
                       fastcgi_temp_file_write_size 256k;
                       fastcgi_intercept_errors on;
               }
               location ~* ^/roundcubemail/(.+\.(jpg|jpeg|gif|css|png|js|ico|html|xml|txt))$ {
                       root /usr/share/;
               }
        }
        location /webmail {
               rewrite ^/* /squirrelmail last;
        }
Now we need a database for roundcube mail, we will initialise it as follows:
mysql -u root -p
At mariadb prompt use:
CREATE DATABASE roundcubedb;
CREATE USER roundcubeuser@localhost IDENTIFIED BY 'roundcubepassword';
GRANT ALL PRIVILEGES on roundcubedb.* to roundcubeuser@localhost ;
FLUSH PRIVILEGES;
exit
I am using details for roundcube database as a test, please replace the values as per your choice for security reasons. We will finish the roundcube installation after we installed ISPConfig.
24 Install ISPConfig 3
Before you start the ISPConfig installation, make sure that Apache is stopped (if it is installed - it is possible that some of your installed packages have installed Apache as a dependency without you knowing). If Apache2 is already installed on the system, stop it now...
systemctl stop httpd.service
... and remove Apache's system startup links:
systemctl disable httpd.service
Make sure that nginx is running:
systemctl restart nginx.service
(If you have both Apache and nginx installed, the installer asks you which one you want to use: Apache and nginx detected. Select server to use for ISPConfig: (apache,nginx) [apache]:
Type nginx. If only Apache or nginx are installed, this is automatically detected by the installer, and no question is asked.)
Download the current ISPConfig 3 version and install it. The ISPConfig installer will configure all services like Postfix, Dovecot, etc. for you. A manual setup as required for ISPConfig 2 is not necessary anymore.
You now also have the possibility to let the installer create an SSL vhost for the ISPConfig control panel, so that ISPConfig can be accessed using https:// instead of http://. To achieve this, just press ENTER when you see this question: Do you want a secure (SSL) connection to the ISPConfig web interface (y,n) [y]:.
To install ISPConfig 3 from the latest released version, do this:
cd /tmp
wget http://www.ispconfig.org/downloads/ISPConfig-3-stable.tar.gz
tar xfz ISPConfig-3-stable.tar.gz
cd ispconfig3_install/install/
The next step is to run
php -q install.php
This will start the ISPConfig 3 installer:
[root@server1 install]# php -q install.php
--------------------------------------------------------------------------------
_____ ___________ _____ __ _ ____
|_ _/ ___| ___ \ / __ \ / _(_) /__ \
| | \ `--.| |_/ / | / \/ ___ _ __ | |_ _ __ _ _/ /
| | `--. \ __/ | | / _ \| '_ \| _| |/ _` | |_ |
_| |_/\__/ / | | \__/\ (_) | | | | | | | (_| | ___\ \
\___/\____/\_| \____/\___/|_| |_|_| |_|\__, | \____/
__/ |
|___/
--------------------------------------------------------------------------------
>> Initial configuration
Operating System: Redhat or compatible, unknown version.
Following will be a few questions for primary configuration so be careful.
Default values are in [brackets] and can be accepted with <ENTER>.
Tap in "quit" (without the quotes) to stop the installer.
Select language (en,de) [en]: <-- ENTER
Installation mode (standard,expert) [standard]: <-- ENTER
Full qualified hostname (FQDN) of the server, eg server1.domain.tld [server1.example.com]: <-- ENTER
MySQL server hostname [localhost]: <-- ENTER
MySQL root username [root]: <-- ENTER
MySQL root password []: <-- yourrootsqlpassword
MySQL database to create [dbispconfig]: <-- ENTER
MySQL charset [utf8]: <-- ENTER
Apache and nginx detected. Select server to use for ISPConfig: (apache,nginx) [apache]: <-- nginx
Generating a 2048 bit RSA private key
......................................................................+++
...............................................+++
writing new private key to 'smtpd.key'
-----
You are about to be asked to enter information that will be incorporated
into your certificate request.
What you are about to enter is what is called a Distinguished Name or a DN.
There are quite a few fields but you can leave some blank
For some fields there will be a default value,
If you enter '.', the field will be left blank.
-----
Country Name (2 letter code) [XX]: <-- ENTER
State or Province Name (full name) []: <-- ENTER
Locality Name (eg, city) [Default City]: <-- ENTER
Organization Name (eg, company) [Default Company Ltd]: <-- ENTER
Organizational Unit Name (eg, section) []: <-- ENTER
Common Name (eg, your name or your server's hostname) []: <-- ENTER
Email Address []: <-- ENTER
Configuring Jailkit
Configuring Dovecot
Configuring Spamassassin
Configuring Amavisd
Configuring Getmail
Configuring Pureftpd
Configuring BIND
Configuring nginx
Configuring Vlogger
Configuring Apps vhost
Configuring Bastille Firewall
Configuring Fail2ban
Installing ISPConfig
ISPConfig Port [8080]: <-- ENTER
Do you want a secure (SSL) connection to the ISPConfig web interface (y,n) [y]: <-- ENTER
Generating RSA private key, 4096 bit long modulus
...........................................................++
...........................................................................++
e is 65537 (0x10001)
You are about to be asked to enter information that will be incorporated
into your certificate request.
What you are about to enter is what is called a Distinguished Name or a DN.
There are quite a few fields but you can leave some blank
For some fields there will be a default value,
If you enter '.', the field will be left blank.
-----
Country Name (2 letter code) [XX]: <-- ENTER
State or Province Name (full name) []: <-- ENTER
Locality Name (eg, city) [Default City]: <-- ENTER
Organization Name (eg, company) [Default Company Ltd]: <-- ENTER
Organizational Unit Name (eg, section) []: <-- ENTER
Common Name (eg, your name or your server's hostname) []: <-- ENTER
Email Address []: <-- ENTER
Please enter the following 'extra' attributes
to be sent with your certificate request
A challenge password []: <-- ENTER
An optional company name []: <-- ENTER
writing RSA key
Configuring DBServer
Installing ISPConfig crontab
no crontab for root
no crontab for getmail
Restarting services ...
Stopping mysqld: [ OK ]
Starting mysqld: [ OK ]
Shutting down postfix: [ OK ]
Starting postfix: [ OK ]
Stopping saslauthd: [FAILED]
Starting saslauthd: [ OK ]
Shutting down amavisd: Daemon [1554] terminated by SIGTERM
[ OK ]
amavisd stopped
Starting amavisd: [ OK ]
Stopping clamd.amavisd: [ OK ]
Starting clamd.amavisd: [ OK ]
Stopping Dovecot Imap: [ OK ]
Starting Dovecot Imap: [ OK ]
Reloading php-fpm: [ OK ]
Reloading nginx: [ OK ]
Stopping pure-ftpd: [ OK ]
Starting pure-ftpd: [ OK ]
Installation completed.
[root@server1 install]#
To fix the Mailman errors you might get during the ISPConfig installation, open /usr/lib/mailman/Mailman/mm_cfg.py...
vi /usr/lib/mailman/Mailman/mm_cfg.py
... and set DEFAULT_SERVER_LANGUAGE = 'en':
[...]
#-------------------------------------------------------------
# The default language for this server.
DEFAULT_SERVER_LANGUAGE = 'en'
[...]
Restart Mailman:
systemctl restart mailman.service
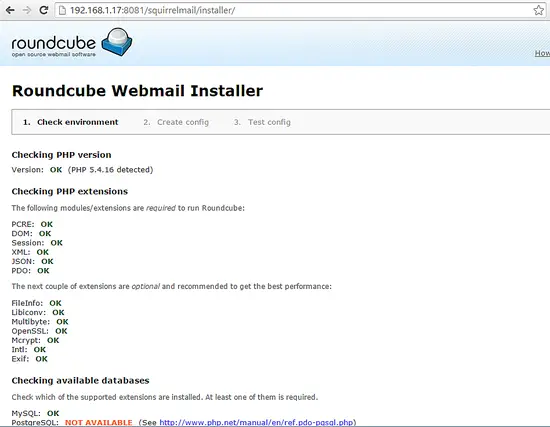
Now I will finish the RoundcubeMail installation. Open the following URL in your browser:
http://192.168.0.100:8081/roundcubemail/installer
you will be greeted by the RoundcubeMail web installer, scroll down the page and click next:
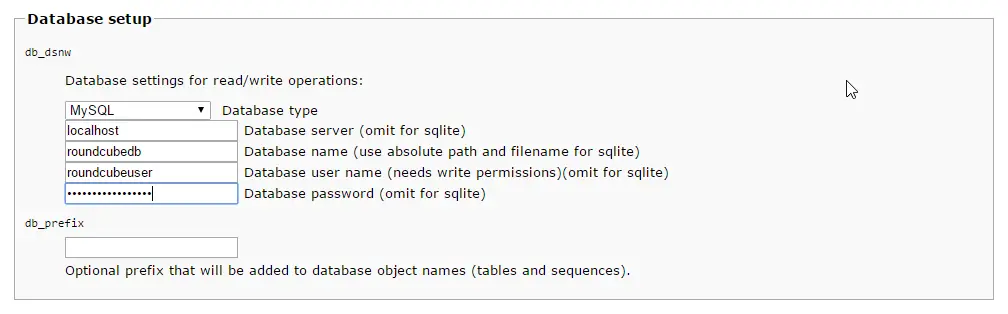
Then enter the database details of the roundcubedb database that we created in chapter 23 here:
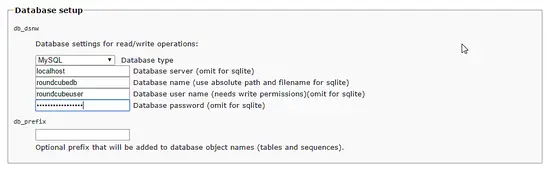
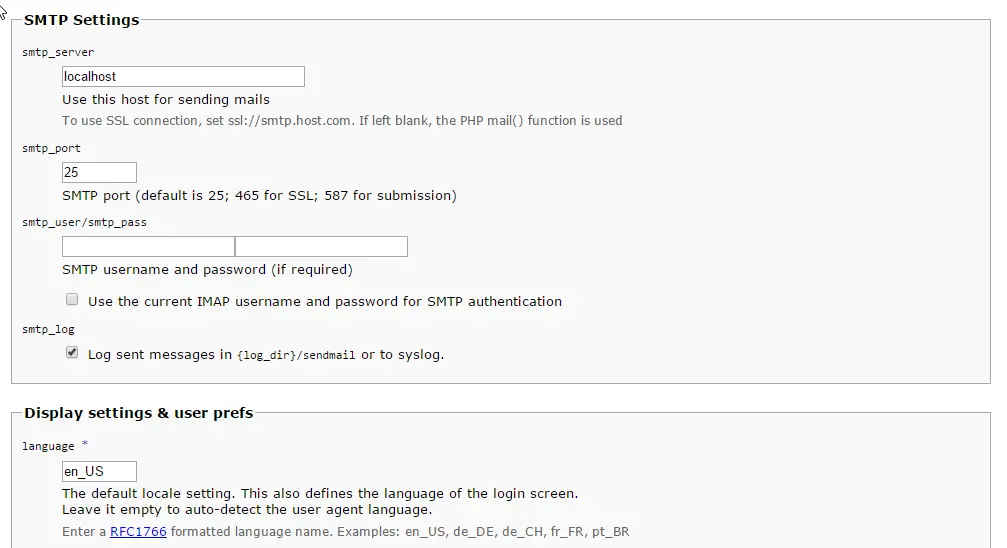
An set the SMTP server to localhost and set your preferred language
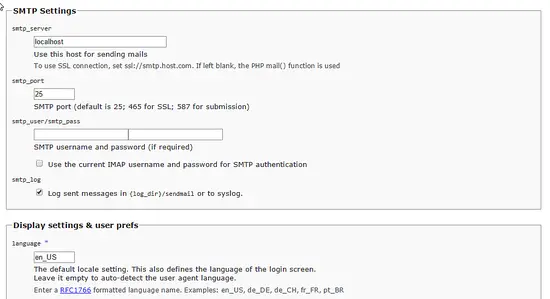
and click on "Create config" to go to the next page.
Open the file /etc/roundcubemail/config.inc.php on the shell:
nano /etc/roundcubemail/config.inc.php
and paste the configuration that is shown in the web installer into that file and save the file.
http://www.afterthedeadline.com before using their API
// Since Google shut down their public spell checking service, you need to
// connect to a Nox Spell Server when using 'googie' here. Therefore specify the 'spellcheck_uri'
$config['spellcheck_engine'] = 'pspell';
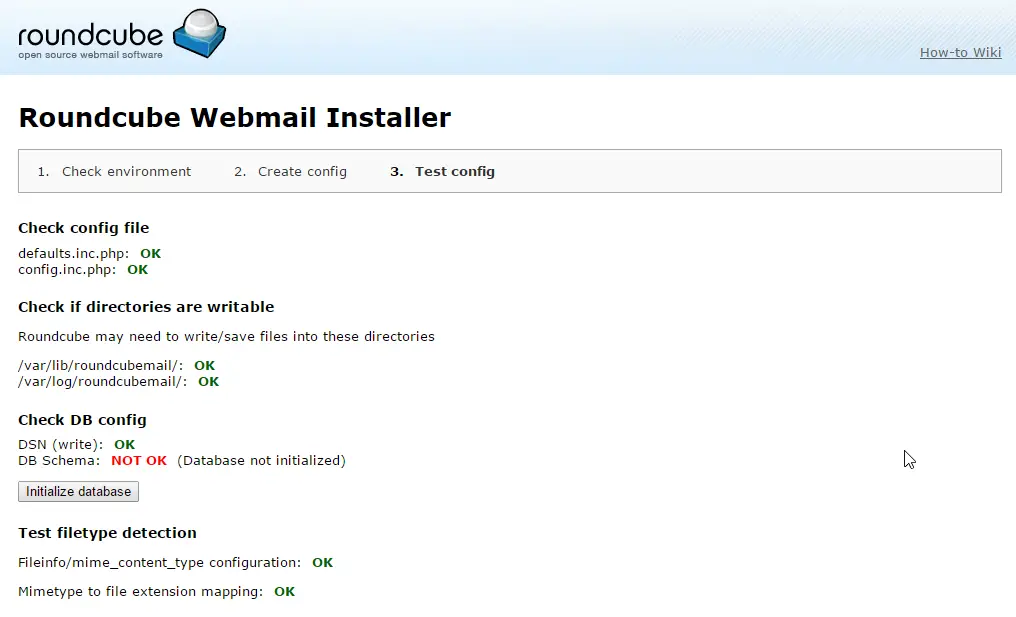
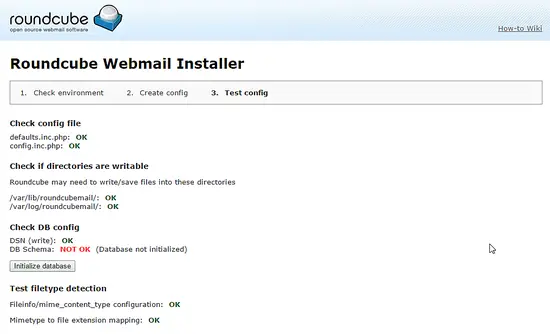
Then go back to the web installer and click on the continue button. On this page, click on "initialize database":
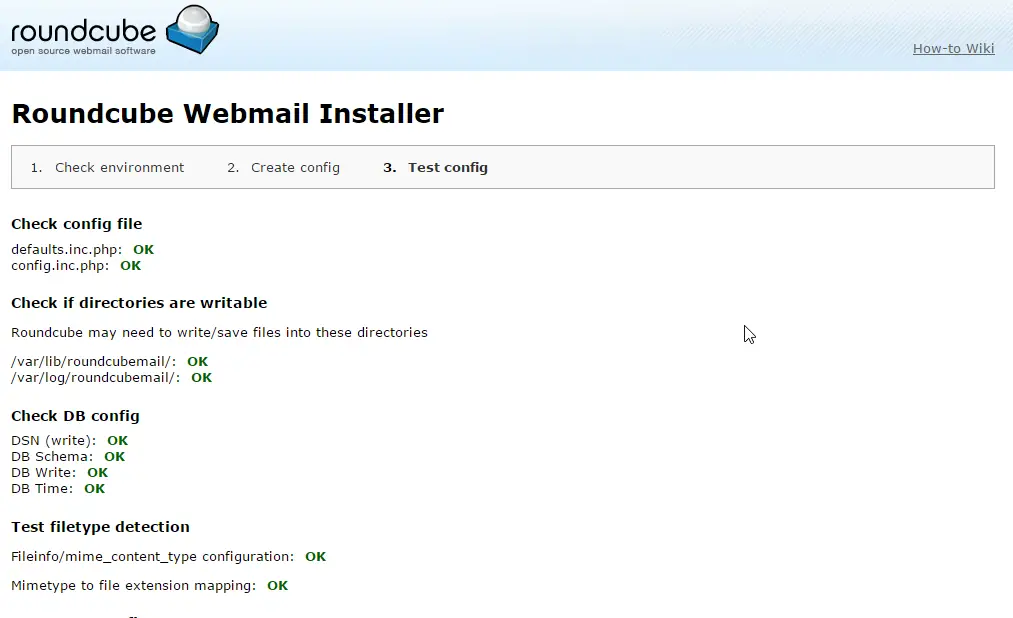
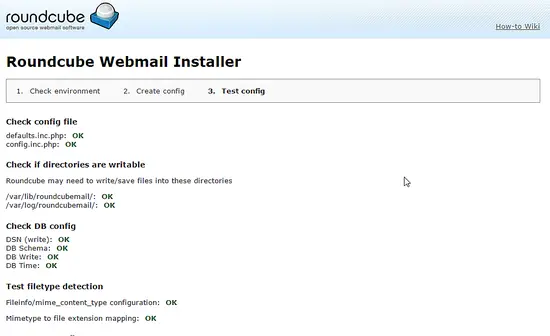
The page should look like this after successfull initialisation of the database:
To protect the RoundcubeMail configuration from unauthorized modifications, I'll remove the installer folder by running this command on the shell:
rm -rf /usr/share/roundcubemail/installer
25 First ISPConfig Login
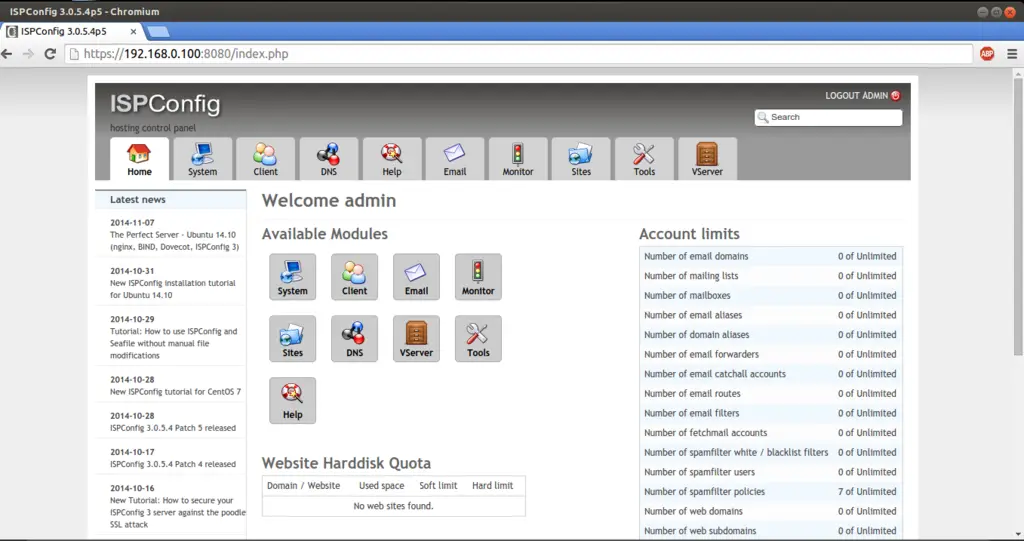
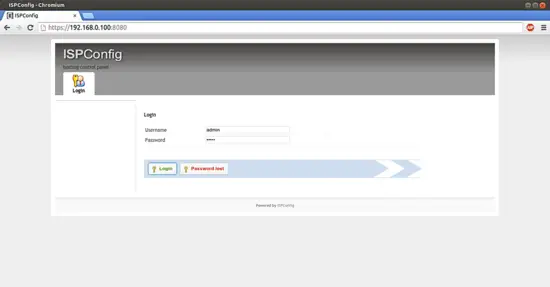
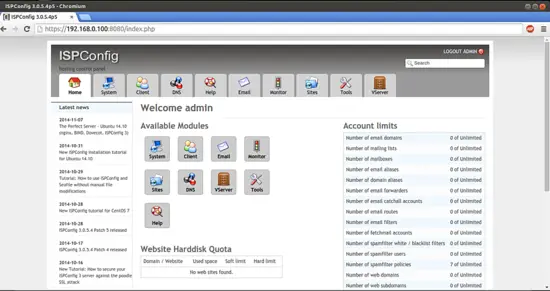
Afterwards you can access ISPConfig 3 under http(s)://server1.example.com:8080/ orhttp(s)://192.168.0.100:8080/ (http or https depends on what you chose during installation). Log in with the username admin and the password admin (you should change the default password after your first login):
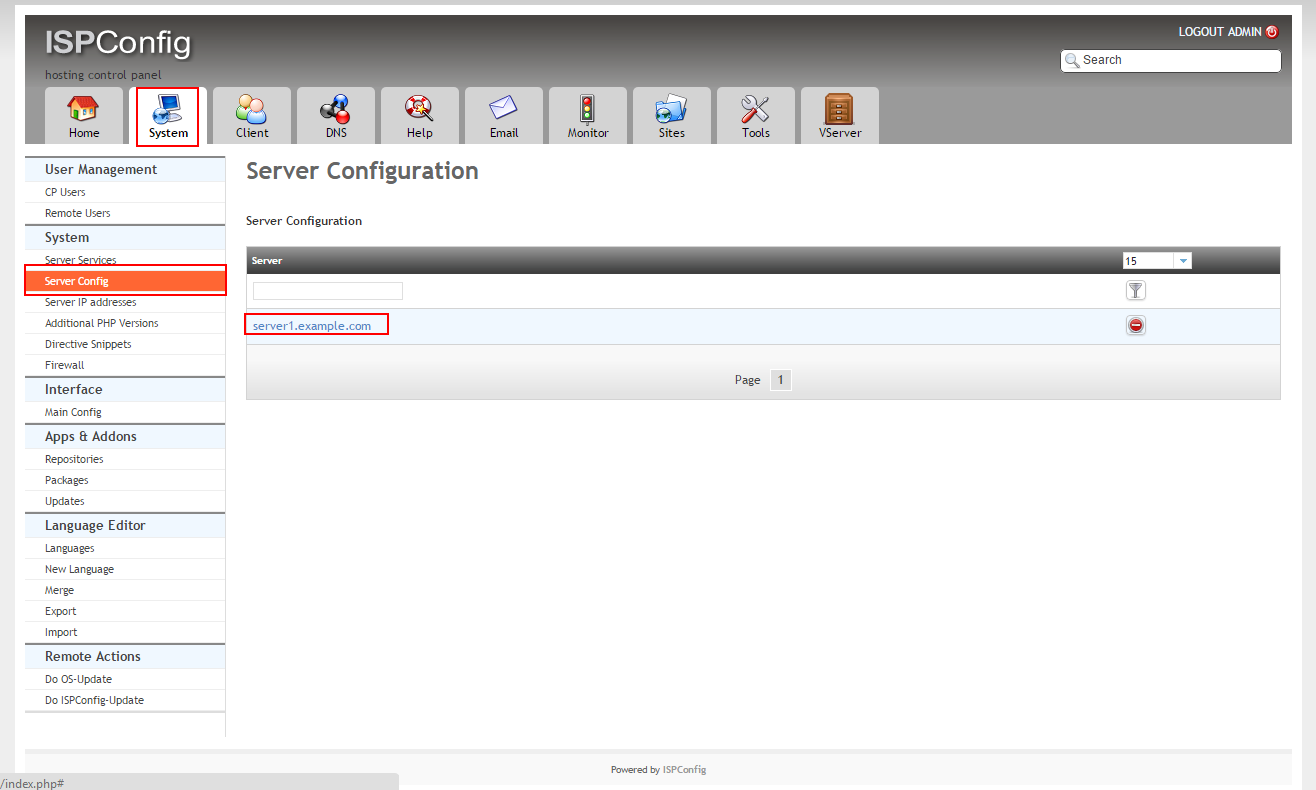
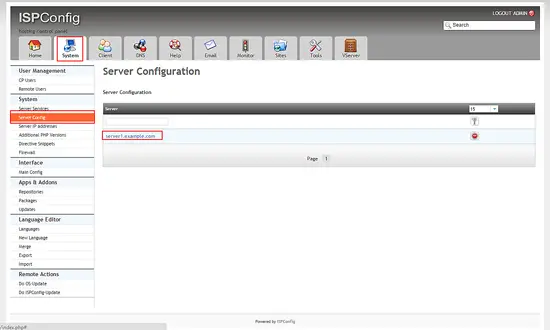
Next we have to adjust the BIND configuartion paths in ISPConfig. Click on "System" in the upper menu, then on "Server config" in the right menu. In the list that appears then on the left side, click on the server name.
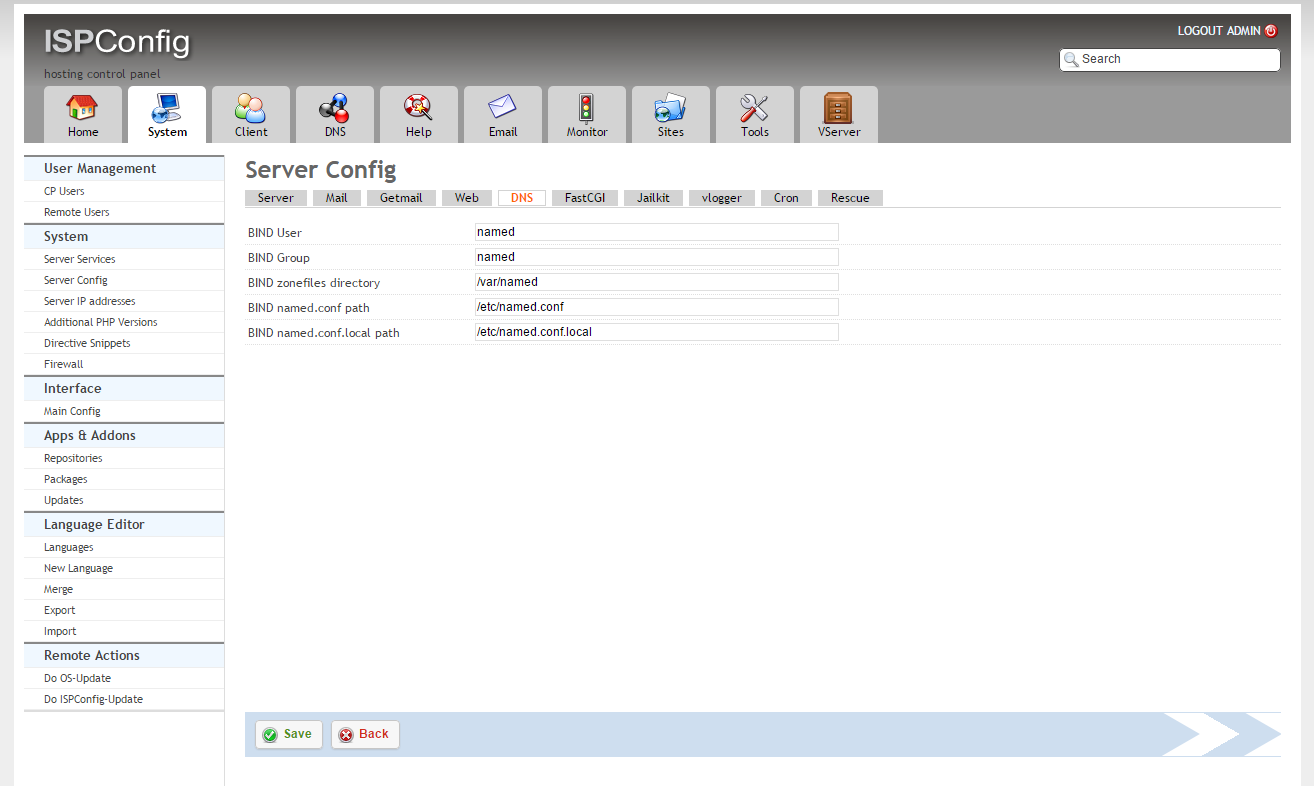
Go to the "DNS" tab of the form:
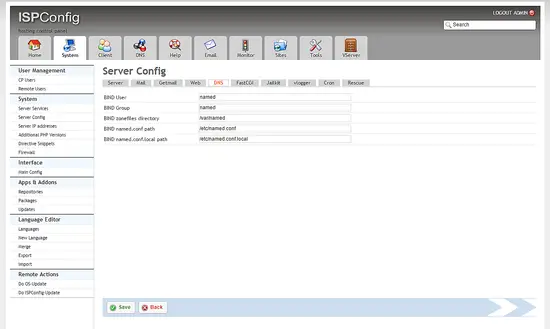
and enter the DNS paths as follows:
BIND zonefiles directory: /var/named
BIND named.conf path: /etc/named.conf
BIND named.conf.local path: /etc/named.conf.local
The system is now ready to be used.
If you want to use IPv6 addresses with your nginx vhosts, please do the following before you create IPv6 vhosts in ISPConfig:
Open /etc/sysctl.conf...
vi /etc/sysctl.conf
... and add the line net.ipv6.bindv6only = 1:
[...]
net.ipv6.bindv6only = 1
Run...
sysctl -p
... afterwards for the change to take effect.
25 Links
 Uploading ....